IoC & DI 기존 포스팅
Spring2.5 - 제어의역전,의존성주입 예제 - https://wiper2019.tistory.com/123
예제1 - 의존성문제란?
의존 : 변경에 의해 영향을 받는 관계.
Message 클래스의 변경에 따라 MessageCall클래스는 영향을 받는다.
이렇게 변경에 따른 영향이 전파되는 관계를 의존한다라고 표현.
1. Message 클래스
|
package com.exe.springdi1; public class Message { public void sayHello(String name) { System.out.println(name+" 반갑습니다!"); } } |
2. MessageCall 클래스
|
package com.exe.springdi1; public class MessageCall { public static void main(String[] args) { Message ob = new Message();//객체생성 //의존성문제 발생. Message클래스가 변동되면 바로 오류가 남 ob.sayHello("호호호"); } } |
실행 결과

예제2 - 인터페이스를 활용한 객체 생성
이러한 의존성문제를 해결하기 위해 스프링은 인터페이스를 활용하였다.
1. Message인터페이스
|
package com.exe.springdi2; public interface Message { public void sayHello(String name); } |
2. MessageKr클래스 (인터페이스 구현 클래스)
|
package com.exe.springdi2; public class MessageKr implements Message{ public void sayHello(String name) { System.out.println(name + "반가워요~ "); } } |
3. MessageEn클래스 (인터페이스 구현 클래스)
|
package com.exe.springdi2; public class MessageEn implements Message{ public void sayHello(String name) { System.out.println("Hello, " +name); } } |
4. MessageCall클래스(Main절)
|
package com.exe.springdi2; public class MessageCall { public static void main(String[] args) { //1. System.out.println("1.일반적인 객체생성.."); MessageEn ob1 = new MessageEn(); ob1.sayHello("suzi");
MessageKr ob2 = new MessageKr(); ob2.sayHello("수지"); //2. System.out.println("2.인터페이스로 객체생성.."); Message ms = null; ms = new MessageEn(); ms.sayHello("Miss A");
ms = new MessageKr(); ms.sayHello("미스에이"); } } |
실행 결과

예제3 - Bean 객체 생성
1. app-context.xml를 통한 bean 객체 생성

|
<?xml version="1.0" encoding="UTF-8"?> <beans xmlns="http://www.springframework.org/schema/beans" xmlns:xsi="http://www.w3.org/2001/XMLSchema-instance" xmlns:context="http://www.springframework.org/schema/context" xsi:schemaLocation="http://www.springframework.org/schema/beans https://www.springframework.org/schema/beans/spring-beans-3.0.xsd http://www.springframework.org/schema/context https://www.springframework.org/schema/context/spring-context-3.0.xsd"> <description>Example configuration to get you started.</description> <!-- 이 환경설정을 어느 패키지에 적용할 것인지 선언. *를 할경우 모든 패키지 적용 --> <context:component-scan base-package="com.exe.springdi3" /> <bean id="message" class="com.exe.springdi3.MessageKr"/>
</beans> |
2. Message인터페이스
|
package com.exe.springdi3; public interface Message { public void sayHello(String name); } |
3. MessageKr클래스(인터페이스 구현 클래스)
|
package com.exe.springdi3; public class MessageKr implements Message{ public void sayHello(String name) { System.out.println(name + "반가워요~ "); } } |
4. MessageEn클래스 (인터페이스 구현 클래스)
|
package com.exe.springdi3; public class MessageEn implements Message{ public void sayHello(String name) { System.out.println("Hello, " +name); } } |
5. MessagService클래스 - 중간처리자 역할
|
package com.exe.springdi3; import org.springframework.context.support.GenericXmlApplicationContext; public class MessageService { public void messageService() { //BeanFactory 생성. Bean객체는 app-context.xml 에서 생성했으므로 메모리상에 올라가있음 GenericXmlApplicationContext context = new GenericXmlApplicationContext("app-context.xml"); //Bean객체 획득 Message ms = (Message)context.getBean("message");//downcast ms.sayHello("수지"); } } |
6. MessageCall클래스(Main절)
|
package com.exe.springdi3; public class MessageCall { public static void main(String[] args) { MessageService ms = new MessageService();//중간관리자 호출 ms.messageService(); } } |
실행 결과

<bean id="message" class="com.exe.springdi3.MessageKr"/>

예제4 - Bean 객체 생성
1. MessageService인터페이스 생성
|
package com.exe.springdi4; public interface MessageService { //public static abstract String getMessage(); //변수에서는 public static final 생략 되어있음 } |
2. MyMessageService클래스 생성
|
package com.exe.springdi4; public class MyMessageService implements MessageService { public String getMessage() { return "안녕하세요 반가워요"; } } |
3. ServiceConsumer클래스 생성
|
package com.exe.springdi4; import org.springframework.context.support.GenericXmlApplicationContext; public class ServiceConsumer { public void consumerService() { GenericXmlApplicationContext context = new GenericXmlApplicationContext("app-context.xml"); MessageService ms = (MessageService)context.getBean("messageService"); String message = ms.getMessage(); System.out.println(message); } } |
4. app-context.xml (Bean 객체 생성)
|
<?xml version="1.0" encoding="UTF-8"?> <beans xmlns="http://www.springframework.org/schema/beans" xmlns:xsi="http://www.w3.org/2001/XMLSchema-instance" xmlns:context="http://www.springframework.org/schema/context" xsi:schemaLocation="http://www.springframework.org/schema/beans https://www.springframework.org/schema/beans/spring-beans-3.0.xsd http://www.springframework.org/schema/context https://www.springframework.org/schema/context/spring-context-3.0.xsd"> <description>Example configuration to get you started.</description> <!-- 이 환경설정을 어느 패키지에 적용할 것인지 선언. *를 할경우 모든 패키지 적용 --> <context:component-scan base-package="*" /> <bean id="message" class="com.exe.springdi3.MessageKr"/> <bean id="messageService" class="com.exe.springdi4.MyMessageService"></bean> </beans> |
5. MessageMain클래스
|
package com.exe.springdi4; public class MessageMain { public static void main(String[] args) { ServiceConsumer sc = new ServiceConsumer(); sc.consumerService(); } } |
실행 결과

예제5 - 생성자를 통한 의존성 주입
1. MessageService 인터페이스 생성
|
package com.exe.springdi4; public interface MessageService { //public static abstract String getMessage(); //변수에서는 public static final 생략 되어있음 } |
2. 인터페이스 구현 클래스 생성 - MyMessageService
|
package com.exe.springdi4; public class MyMessageService implements MessageService { public String getMessage() { return "안녕하세요 반가워요"; } } |
3. app-context.xml (생성자를 통한 의존성 주입)
|
<?xml version="1.0" encoding="UTF-8"?> <beans xmlns="http://www.springframework.org/schema/beans" xmlns:xsi="http://www.w3.org/2001/XMLSchema-instance" xmlns:context="http://www.springframework.org/schema/context" xsi:schemaLocation="http://www.springframework.org/schema/beans https://www.springframework.org/schema/beans/spring-beans-3.0.xsd http://www.springframework.org/schema/context https://www.springframework.org/schema/context/spring-context-3.0.xsd"> <description>Example configuration to get you started.</description> <context:component-scan base-package="*" /> <bean id="serviceConsumer" class="com.exe.springdi4.ServiceConsumer"> <!-- 생성자를 통한 의존성주입. serviceConsumer가 객체 생성시 반드시 messageService 필요. 제어의역전 --> <constructor-arg ref="messageService"/> </bean> <bean id="messageService" class="com.exe.springdi4.MyMessageService"></bean> </beans> |
4. ServiceConsumer에 오버라이딩된 생성자 만들기
MessageService ms = (MessageService)context.getBean("messageService");
생성자를 통한 의존성주입으로 constructor-arg 프로퍼티를 통해 bean객체 생성을 진행한다.
<bean id="serviceConsumer" class="com.exe.springdi4.ServiceConsumer">
<constructor-arg ref="messageService"/>
</bean>
<bean id="messageService" class="com.exe.springdi4.MyMessageService"></bean>
|
package com.exe.springdi4; import org.springframework.context.support.GenericXmlApplicationContext; public class ServiceConsumer { //MessageService ms = (MessageService)context.getBean("messageService");와 동일 MessageService ms; public ServiceConsumer(MessageService ms) { this.ms = ms; } public void consumerService() { String message = ms.getMessage(); System.out.println(message); } } |
5. MessageMain클래스 생성
|
package com.exe.springdi4; import org.springframework.context.support.GenericXmlApplicationContext; public class MessageMain { public static void main(String[] args) { GenericXmlApplicationContext context = new GenericXmlApplicationContext("app-context.xml"); ServiceConsumer sc = (ServiceConsumer)context.getBean("serviceConsumer"); sc.consumerService(); } } |
실행 결과

예제6 - 메소드를 통한 의존성주입
1. TimeService 인터페이스 생성
|
package com.exe.springdi4; public interface TimeService { public String getTimeString(); } |
2. MyTimerService 클래스 생성
|
package com.exe.springdi4; import java.text.SimpleDateFormat; import java.util.Date; public class MyTimerService implements TimeService{
public String getTimeString() { SimpleDateFormat sdf = (SimpleDateFormat)SimpleDateFormat .getDateTimeInstance(SimpleDateFormat.LONG, SimpleDateFormat.LONG); String now = sdf.format(new Date()); //날짜 반환 return now; } } |
3. 의존성 주입하는 중간관리자 클래스 생성 - ServiceConsumer
ServiceConsumer 가 객체를 생성할 때 ts, ms 모두 필요하다.
오버로딩된 생성자가 있고 기본생성자가 없을 경우 기본생성자를 사용할 수 없다.
|
package com.exe.springdi4; public class ServiceConsumer { //생성자로 의존성 주입 //MessageService ms = (MessageService)context.getBean("messageService");와 동일 MessageService ms; public ServiceConsumer(MessageService ms) {//오버라이딩된 생성자 this.ms = ms; }
//메소드로 의존성 주입 TimeService ts; public ServiceConsumer(){}//기본생성자 public void setTimeService(TimeService ts) { this.ts = ts; }
public void consumerService() { //생성자 의존성 주입 String message = ms.getMessage(); System.out.println(message);
//메소드 의존성 주입 String time = ts.getTimeString(); System.out.println(time); } } |
4. app-context.xml
|
<?xml version="1.0" encoding="UTF-8"?> <beans xmlns="http://www.springframework.org/schema/beans" xmlns:xsi="http://www.w3.org/2001/XMLSchema-instance" xmlns:context="http://www.springframework.org/schema/context" xsi:schemaLocation="http://www.springframework.org/schema/beans https://www.springframework.org/schema/beans/spring-beans-3.0.xsd http://www.springframework.org/schema/context https://www.springframework.org/schema/context/spring-context-3.0.xsd"> <description>Example configuration to get you started.</description> <!-- 이 환경설정을 어느 패키지에 적용할 것인지 선언. *를 할경우 모든 패키지 적용 --> <context:component-scan base-package="*" /> <bean id="message" class="com.exe.springdi3.MessageKr"/>
<bean id="serviceConsumer" class="com.exe.springdi4.ServiceConsumer"> <!-- 생성자를 통한 의존성주입. serviceConsumer가 객체 생성시 반드시 messageService 필요. 제어의역전 --> <constructor-arg ref="messageService"/> <property name="timeService" ref="timeService"></property> </bean> <bean id="messageService" class="com.exe.springdi4.MyMessageService"></bean> <bean id="timeService" class="com.exe.springdi4.MyTimerService"></bean> </beans> |
실행 결과

예제7 - 메소드를 통한 의존성주입2
1. JobService 인터페이스
|
package com.exe.springdi4; public interface JobService { public void getJob(); } |
2.MyJobService 인터페이스 구현 클래스
|
package com.exe.springdi4; public class MyJobService implements JobService { public void getJob() { System.out.println("나는 프로그래머 입니다."); } } |
3.ServiceConsumer 클래스 생성
|
package com.exe.springdi4; import org.springframework.context.support.GenericXmlApplicationContext; public class ServiceConsumer { //생성자로 의존성 주입 //MessageService ms = (MessageService)context.getBean("messageService");와 동일 MessageService ms; public ServiceConsumer(MessageService ms) {//오버라이딩된 생성자 this.ms = ms; }
//메소드로 의존성 주입 TimeService ts; public ServiceConsumer(){}//기본생성자 public void setTimeService(TimeService ts) { this.ts = ts; }
//메소드로 의존성 주입 JobService js; public void setJobService(JobService js) { this.js = js; }
public void consumerService() { //생성자 의존성 주입 String message = ms.getMessage(); System.out.println(message);
//메소드 의존성 주입1 String time = ts.getTimeString(); System.out.println(time);
//메소드 의존성 주입2 js.getJob(); } } |
4. app-context.xml
|
<?xml version="1.0" encoding="UTF-8"?> <beans xmlns="http://www.springframework.org/schema/beans" xmlns:xsi="http://www.w3.org/2001/XMLSchema-instance" xmlns:context="http://www.springframework.org/schema/context" xsi:schemaLocation="http://www.springframework.org/schema/beans https://www.springframework.org/schema/beans/spring-beans-3.0.xsd http://www.springframework.org/schema/context https://www.springframework.org/schema/context/spring-context-3.0.xsd"> <description>Example configuration to get you started.</description> <!-- 이 환경설정을 어느 패키지에 적용할 것인지 선언. *를 할경우 모든 패키지 적용 --> <context:component-scan base-package="*" /> <bean id="message" class="com.exe.springdi3.MessageKr"/>
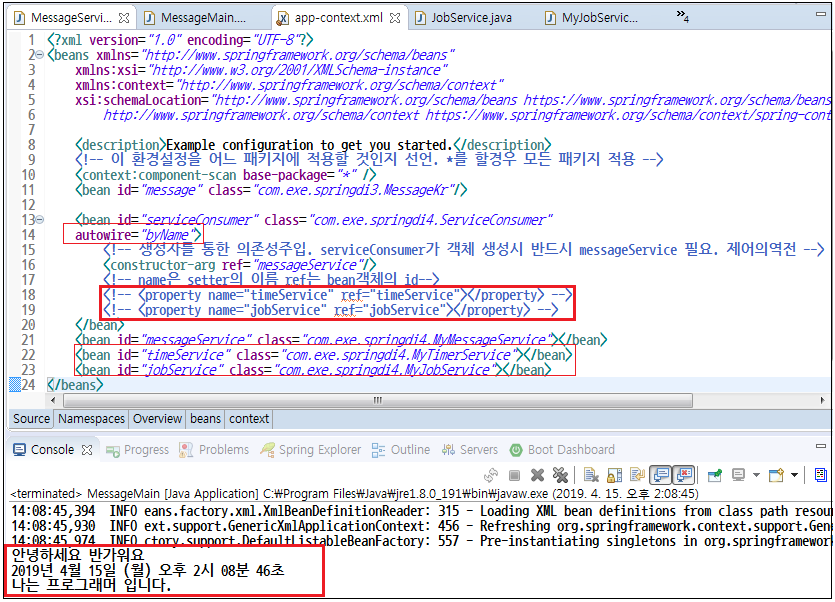
<bean id="serviceConsumer" class="com.exe.springdi4.ServiceConsumer"> <!-- 생성자를 통한 의존성주입. serviceConsumer가 객체 생성시 반드시 messageService 필요. 제어의역전 --> <constructor-arg ref="messageService"/> <property name="timeService" ref="timeService"></property> <!-- name은 setter의 이름 ref는 bean객체의 id--> <property name="jobService" ref="jobService"></property> </bean> <bean id="messageService" class="com.exe.springdi4.MyMessageService"></bean> <bean id="timeService" class="com.exe.springdi4.MyTimerService"></bean> <bean id="jobService" class="com.exe.springdi4.MyJobService"></bean> </beans> |
실행 결과

의존관계 자동설정 autowire=”byName”
SpringDI2 프로젝트 - Annotation
Annotation
@Component : 자동으로 빈 등록
<bean id="messageService" class="com.exe.springdi4.MyMessageService"></bean> 이 작업을 대신해줌
@Scope
자동으로 등록되는 빈의 범위 지정
singleton, prototype, session …
@Required
Setter 메서드에 지정해서 반드시 설정해야 하는 필수 프로퍼티 정의
@Autowired
Setter 메서드, 생성자 메서드 또는 필드(프로퍼티)에 직접 설정 해서 자동으로 의존성 주입이 수행되도록 구성
@Autowired with (required = false)
컨테이너가 자동으로 의존성 주입을 수행할 때 대상 Bean을 발견하지 못해도 오류를 발생시키지 않도록 설정
@Qualifier(“객체명지정”)
@Autowired와 함께 사용되어서 자동 의존성 주입이 수행될 대상 Bean을 구체적으로 설정
같은 타입의 Bean이 두 개 이상 등록된 경우 @Autowired에 발생할 수 있는 모호성 제거
@Resource
@Autowired + @Qualifier와 같은 효과
1. Annotation을 이용해서 객체를 생성할 것이므로 bean태그로 생성한 객체를 지운다!
|
<!-- 이 환경설정을 어느 패키지에 적용할 것인지 선언. *를 할경우 모든 패키지 적용 --> <context:component-scan base-package="*" /> <bean id="message" class="com.exe.springdi3.MessageKr"/> <bean id="serviceConsumer" class="com.exe.springdi4.ServiceConsumer"autowire="byName"> 생성자를 통한 의존성주입. serviceConsumer가 객체 생성시 반드시 messageService 필요. 제어의역전 <constructor-arg ref="messageService"/> name은 setter의 이름 ref는 bean객체의 id <property name="timeService" ref="timeService"></property> <property name="jobService" ref="jobService"></property> </bean> <bean id="messageService" class="com.exe.springdi4.MyMessageService"></bean> <bean id="timeService" class="com.exe.springdi4.MyTimerService"></bean> <bean id="jobService" class="com.exe.springdi4.MyJobService"></bean> |
2. ServiceConsumer
|
package com.exe.springdi4; import org.springframework.beans.factory.annotation.Autowired; import org.springframework.beans.factory.annotation.Qualifier; import org.springframework.stereotype.Component; //@Component("serviceConsumer") : <bean id="serviceConsumer" class="com.exe.springdi4.ServiceConsumer"> @Component("serviceConsumer") public class ServiceConsumer {
//생성자로 의존성 주입 //@Autowired : <constructor-arg ref="messageService"/> @Autowired @Qualifier("messageService")//객체명 지정 MessageService ms;
//메소드로 의존성 주입 //<property name="timeService" ref="timeService"></property> @Autowired //기본생성자와 setter가 필요없다. 알아서 받아온다. TimeService ts;
//메소드로 의존성 주입 //<property name="jobService" ref="jobService"></property> @Autowired JobService js;
public void consumerService() { //생성자 의존성 주입 String message = ms.getMessage(); System.out.println(message);
//메소드 의존성 주입1 String time = ts.getTimeString(); System.out.println(time);
//메소드 의존성 주입2 js.getJob(); } } |
3. MyMessageService
|
package com.exe.springdi4; import org.springframework.stereotype.Component; // @Component("messageService") : <bean id="messageService" class="com.exe.springdi4.MyMessageService"></bean> @Component("messageService") @Scope(value = "prototype")//현재페이지에서만 인식되도록 범위설정. 생략해도 상관없음. default가 prototype public class MyMessageService implements MessageService { public String getMessage() { return "안녕하세요 반가워요"; } } |
4. MyJobService
|
package com.exe.springdi4; import org.springframework.stereotype.Component; //@Component("dummyService") :<bean id="jobService" class="com.exe.springdi4.MyJobService"></bean> @Component("dummyService") //내부적으로 매핑해서 사용하므로 이름을 동일하게 맞추지않아도 오류안남 public class MyJobService implements JobService { public void getJob() { System.out.println("나는 프로그래머 입니다."); } } |
5. MyTimerService
|
package com.exe.springdi4; import java.text.SimpleDateFormat; import java.util.Date; import org.springframework.stereotype.Component; //@Component("timeService") : <bean id="timeService" class="com.exe.springdi4.MyTimerService"></bean> @Component("timeService") public class MyTimerService implements TimeService{
public String getTimeString() { SimpleDateFormat sdf = (SimpleDateFormat)SimpleDateFormat .getDateTimeInstance(SimpleDateFormat.LONG, SimpleDateFormat.LONG); String now = sdf.format(new Date()); //날짜 반환 return now; } } |
실행 결과
어노테이션을 사용하여 객체를 생성하여 실행해도 문제없이 진행되는 것을 볼수있다.

'Dev > Spring' 카테고리의 다른 글
| Spring3.0 MVC 예제(2) (0) | 2019.04.16 |
|---|---|
| Spring3.0 MVC 예제(1) (0) | 2019.04.15 |
| Spring 3.0 셋팅 (0) | 2019.04.15 |
| Spring2.5 - tiles (0) | 2019.04.09 |
| Spring2.5 - 파일게시판(업로드/다운로드/삭제) (0) | 2019.04.08 |